
Matched Properties
The Send Matched Properties feature in RealtySoft Property Manager allows properties to be emailed to clients both manually and automated. This ensures that potential buyers or sales agents receive updates about newly listed properties as required.
Setting up Matched Properties
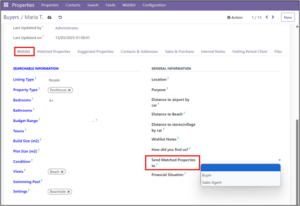
Navigate to the Contacts menu and open the relevant buyer’s profile.

Under the Wishlist section, enter the necessary details such as property type, preferred location, budget, and any other specifications that will help in filtering the right properties.
Once the Wishlist details are completed, you must define who should receive the matched properties.
The Send Matched Properties To? field determines whether emails will be sent to:
- If left blank, no emails will be sent.
- If set to Buyer, the system will send matched properties directly to the buyer.
- If set to Sales Agent, the properties will be sent to the designated sales agent.
After configuring these settings, save the Wishlist preferences.
Sending matched properties manually
To send matched properties manually, navigate to the Matched Properties section in the buyer’s contact record
Select the desired properties, and click Send Matched Properties.

Enabling the Auto-Send Properties Feature
Activate Developer Mode
To activate the auto-send function, Developer Mode must be enabled (Kindly refer to our knowledge base on how to do this).
Once Developer Mode is active, navigate to Settings > Technical > Scheduled Actions and search for Auto-Send New Property Email in the list. Open this scheduled action to modify its settings.
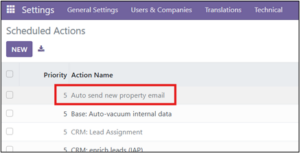
Inside the Auto-Send New Property action, ensure that the Active checkbox is enabled so that property emails will be sent automatically.
The next step is to configure the execution frequency based on business requirements. You can define whether emails should be sent daily, weekly, or at a custom interval.
Additionally, set the Next Execution Date and specify the exact time when the system should execute the auto-send function. Once these settings are adjusted, save the configuration to activate the scheduled action.

Post-Configuration Checks
After enabling and configuring the auto-send function, perform these checks to ensure proper functionality:
- Verify Email Delivery
- Adjust Frequency as Needed
- Confirm Client Categorization
Important Notes
- This feature applies to all clients unless specified otherwise.
- If the Send Match Properties To field is left blank, no emails will be sent.
- Ensure that recipients have valid email addresses in their contact records.